Thursday, May 23, 2013

The Darkside


You don't know the power of the dark side!

Oops. This isn't about any characters who do supernatural things by pointing their hands anywhere, or about stellar starfighters taking down the villainous overpowered evil empire.

This is about what the motorcycle community has dubbed "going to the darkside", a term for a motorcycle owner that has put a car tire on the rear wheel of their ride instead of a standard one. Not exciting? Then you probably don't ride.

I have heard and seen a couple bikers put car tires on their motorcycles. They love it. They said it takes a bit of time to get used to but they have not had problems. So I figured once I was due for a new rear tire on my motorcycle I would give the conversion a try.
Got every mile out of this one!

I own a 2005 Kawasaki Vulcan 1600 and I got the full 10,000 miles out of the tire. I was informed that motorcycle maintenance shops will not take in your motorcycle and change the tire to a car tire. Safety, legalities, liability, etc. etc., but this topic is being discussed by many riders so they know it can be done, so I think they are doing what's best for their business. That is understandable.

If you pull your wheel off and take it and the tire you want to a shop, some will still do the swap, because the liability falls on the owner because if anything goes wrong, faulty wheel (not tire) installation can be argued.

The Kawasaki runs on a 170/70R16 and the closest tire I could find to this size was Goodyear's 175/60R16 tire. I did the math and noted it was 5mm wider and 5mm more shallow. What that meant is that the motorcycle tire has a round profile and this one had a round/flat profile. IF you do this, try your best to keep your x/y tire numbers as close as possible to your original tires. Also make sure you have the tires in hand before starting your tire change. My tire size is rare so it took 3 days to get it shipped for me to pick up.

I found someone to install the tire and here it is!

On the second pic I use the left bracket to show that this tire is perfect for my needs. I didn't want a tire with a square edge because cornering becomes extremely difficult. The right arrow is just to show how, for a car tire, this tire has a nice radius on it. So I installed it with difficulty and here's how it looks:


Looks great! I took it for a ride and got to 70mph+. It gets there smoothly and I didn't feel anything that leads me to believe there are installation problems. Now on to the numbers and facts.

1. This tire cost $131 and will get 30,000-40,000 miles. The OEM tire costs $165 and gets 10,000 miles tops.
2. If you have a hitch installed on your ride, MAKE SURE the tire doesn't rub on it.
3. Pay close attention to how the motorcycle moves. With this tire I noticed that on roads with a grade towards the shoulder (many of them are like this) it will really want to pull you to the shoulder.
4. Your bike seems more wobbly. IT WANTS TO STAND UP. Don't let this panic you, get used to it and your riding will be back to fun very quickly.

Have fun riding and may the LORD keep you upright and bless your days.

Wednesday, January 2, 2013

Sometimes being humble IS being proud

     I made another modification to my rifle and I talked myself out of blogging about the modification part and process. My initial thought was that I did not want to come across as "look at what I have" and fall into pride, because I have learned from the Lord's Word: "Pride comes before destruction, and an arrogant spirit before a fall." [Proverbs 16:18].

     I do, however, mean to make the most of the working talent God has given me in fabrication and metal working. So after realizing that my humility was also bordering on foolishness, I decided to document my recent project: a customized rail modification for the Saiga .308 so that it will take a night vision monocular.
   
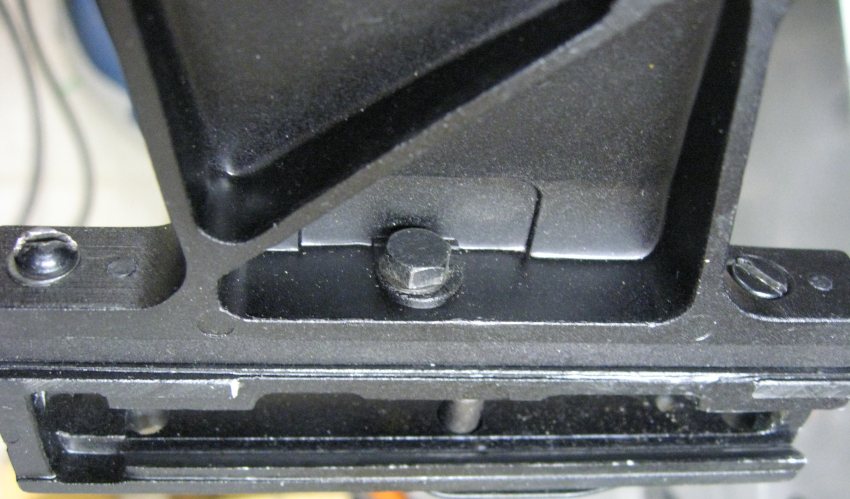
     I would like to...point out that the upper NV mounting plate comes with the monocular from Holmes Tactical, a local business here in Larue, Texas. They sell the night vision monocular and the rail mounting kit for common ARs, but my Saiga rail is low on the side and more narrow than standard rails. Additionally, it specifically takes a certain scope mount and not much of anything else. This is what it looked like to start:
   
     Here were my options: Take the screws from the upper scope mounting and make something that would screw into those holes...

...or take out the three holes closer to the rail base and work from here to make my part:
  
     I felt it would be easier to work with the base closer to the rail mount piece. I went and got 3 feet CR steel angle iron from the local hardware store and gathered all the parts I would need.
   
     First, I took the lower rail mount off the upper scope mount plate so I could measure the mounting screw holes.
    
     Then I cut 4 1/4 inches of the angle iron, then trimmed about 1 3/8 inches off one leg of it. I measured and drilled three holes for the screws that attach it to the lower rail mount.
   
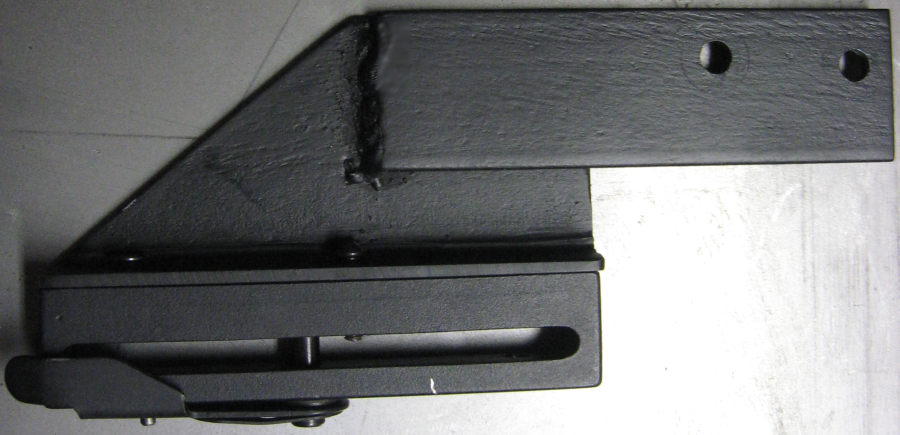
     At the time I thought the strip I cut from the angle leg would be scrap, but when I initially test mounted the NV unit, it was too far forward to look through. So I welded it to give me about 2 1/2 inches of back reach. In addition, the width of the material helped greatly because the night vision unit was about 3/8 of an inch right of center to the rifle.
     Next I put the two pieces together and it looked great for what I intended!
     Finally I put the NV mounting bracket on and used some spacer rings to get the NV center to the rifle.
     Done! I plan to develop a more aesthetically pleasing model (if possible) to sell but it functions perfectly. If you know anyone or hear of anyone looking for some modifications to their firearms (legal ones), please send me an email or send me a private message on Facebook and let's work something out!

Friday, December 28, 2012

Weapons Upgrade

     I must confess that in light of the Sandy Hook shootings, I had a bit of gun fever. Not because of fear of criminals with fire arms, but because rifle costs would go through the roof. For many years I have wanted an AR-15 but the $1000 price tag has always been a major deterrent. Instead, well over 10 years ago, I bought a Saiga Arms .308 (7.62x51). It was a basic AK-47 style 8 round capacity semi automatic rifle with a 4x32 scope for $300 and tax.
     While I was living in Washington and Colorado the most use it got was target practice. It's powerful and fun to watch the shockwave come off the muzzle when a friend shoots it in the prone position.

     Now I live in Texas and this year I have taken this rifle white tail deer hunting. I put down my second deer with this rifle, an 11 point buck on my father-in-law's property. (On a side note, everyone wants to hunt on his property now!) Now, part of the AR-15 fever is not only about the gun law revision that may or may not happen in the near future in this country, it's about the rifle accessories you can put on an AR-15. Illuminators, laser targeting, night vision, bipod, etc. I could not do that with this gun, and two years after I bought my Saiga rifle, Saiga Arms was bought out by Remington.

     I had heard that there are companies that still made aftermarket parts for the Saiga .308 so I checked a few websites. Initially I didn't understand what I was looking at or what some of the terms on the websites meant, so I wasn't encouraged by some of the $300 price tags I saw. I decided to go look into gun forums and found the exact names for the parts I was looking for. I went back and entered those names and what a difference! $55 for a pistol grip buttstock and $65 for a hand grip that takes rail mountings!

     The process of changing the hand grip and butt stock was interesting. All the butt stock instructions say about removing the old stock is "remove the old stock". It didn't tell you about a hidden screw under the spring latch cover! Luckily I didn't man handle the rifle but instead ran to the internet to get an answer. I removed the hidden screw and after sanding down one screw a little, I got the stock changed and tight.

     On to the hand grip. One of the screws needed to be sanded down a bit. Be forewarned, it didn't come with any allen wrenches so if you do this conversion, make sure you have a good set of hex wrenches. This is the gun with both pieces on it.


Looks great! Now to show what it will look like fully ready.
     Looks like Vera is all dressed up! What date will she go out on? Pig hunting! In areas where hogs are a nuisance, such as Texas, Alabama, Georgia, etc., you can hunt pigs all year around. With the illuminator on this rifle it will help with my night hunting and the laser helps with accuracy. Bacon and sausage coming up!

   The love of the Lord Jesus be with you this next year, and God bless!

Friday, December 14, 2012

Nothing new under the sun...

     It looks original, but it's already been done. Live a joyful life for God and His Son Jesus Christ. Because there's nothing new under the sun; what seems new has already been done.

     The extended footpegs on my wife's Kawasaki 1600 Vulcan need to be improved. My wife is tall and when we ride together, with the stock footpegs on it, my wife's knees were almost up in my ribs and in severe pain after a full day of riding. Awhile back I "engineered" footpeg extensions that go out over the large pipes on the motorcycle and extend forward about 6 inches. Anyways, it's finagle time, and I know just the finagler to do it!

    I purchased a welder early last year and haven't had any relevant projects to use it on until now. This is a task that has been on the back burner for some time, and with our schedule clearing up a bit, now is the time to work on it.

     This is the footpeg that is getting reworked:
Someone needs to wash those pipes...
     The main problem with them is that they should always have about a 30 degree forward slant. No matter how much I tighten the main bolt, the footpeg pivots at either the peg to cycle mount point or at the other end where the square tube drops down from the round tube. In order to ensure there is no pivoting at the outer point, I will weld a six inch steel square tube to the round steel tube. Additionally, to stop pivoting at the mounting point, I will weld a small plate onto the end of the round tube that is rectangular and fits into the indentation of the mounting bracket. Easy enough!

     Only not, because I will tell you about all the surprises I get hit by as I do this project.

     To start, I cut my square tube and the plates to cap it and the plate to fill in the mounting indentation:
     This is before welding. Keep this in mind: of all the machining and fabrication I have done to date, welding is the one trade I have done the least. Even though I read the manual to be sure it was as simple as it seemed, using a machine that generates enough electricity to fuse metal is nerve wracking. It also means my welds will be terrible until I learn my welder.

     Here are the first pieces together:
     Those are some UGLY welds, but the parts definitely came together well. A good grinder, sander, and painting will hide all that, though. You'll see!

     I checked this part against the motorcycle mount:
     Clears the pipes well enough! I also designed it to have that 1 inch rise on the upper square tube so that the passenger's foot is less likely to slide off the upper peg. I now have a permanent forward angle and the mounting indentation is filled out with the square plate to stop swinging from that point.

     Now to the footpeg going onto the extender:
     Well this isn't good. The bolt didn't reach through the square tube! I just hit a major snag and even though I quickly engineered an answer, my one day project is now a two day job. To solve this, I would have to cut and drill out the bolt and install a new one. I would also have to tack weld it to imitate the original bolt design. Here's what it looked like:
     I ended up sanding down the bolt head so that the pivoting action of the footpeg wouldn't be blocked. It worked great!

     Almost done! One last task to make these footpegs look amazing. Paint! Gotta cover those awful welds, after all.
Primered...
...painted!
     I am aware of the holes in one of them, I will probably hide them behind some grip tape. They look much better and those ugly welds are no longer noticable.

     Onto the motorcycle they go. This is how one looks:
Pipes still need cleaning...
     A major improvement!

     My joy is in this work, even if it is improving what was there. What I experienced is this...
     "It is the gift of God whenever anyone eats, drinks, and enjoys all his efforts. I know that all God does will last forever; there is no adding to it or taking from it. God works so that people will be in awe of Him. Whatever is, has already been, and whatever will be, already is. God repeats what has passed." [Eccl. 3:13-15, HCSB]

     Live a joyful life for God and His Son Jesus Christ. Because there's nothing new under the sun; what seems new has already been done.

Friday, November 30, 2012

Elwood Gets a Windshield

Yesterday (11-29-12) I started a new project, to make a new windshield for Elwood (the 1979 H-D 1200 Fatbob). There are a couple factors in this, 1) the old windshield was short and narrow, and 2) it had about a 60 degree angle and was hitting the handlebars and brake/clutch cables. So this project is twofold in purpose: larger windshield, higher canter.

When I made the windshield for the Kawasaki we bought a large piece of lexan polycarbonate. Thankfully, there was enough left over for Elwood. So I had a 36 x 25 inch piece of lexan and the support strip from the old windshield. I would need more reinforcement for the shape of the windshield, so I went to a local hardware store and picked up some aluminum U-bracket material, a strip of 1" x 36" galvanized steel, and a strip of 1/2" x 72" aluminum. Here's some of what I am using:
I cut the aluminum strip and U-bracket to 33 inches so that it will reinforce the sides of the windshield. If I don't do this, it looks wavy. I cut the galvanized strip to 25 inches to help shape the curve of the windshield. I do all the drilling and mounting and I have a pretty good looking windshield. So at this point, before I drill the holes for the mounting bracket on Elwood, I set the 'shield on the motorcycle to get an idea of what it will look like:


Ummmm.....
Well that was unintentional. That's a tall windshield!

Back to the cutting tools! I went back to sizing it properly and I got called on an emergency mission by my wife. Something to do with paying for an event ticket. I go to start the Kawasaki and the battery was dead! Guess I have to take Elwood, even without a windshield. I went about 3 miles and discovered how cold the wind is when it's blasting you at 35 to 45mph.  I have an even greater appreciation for a windshield. It keeps the bugs off AND that blasting cold wind!

I get back home and back to work on the windshield. I cut about 2 inches off the top and put a curve to it. I also had to angle cut the bottom outside a few inches because the 'shield was jamming into the gas tank when the wheel was fully turned. After wearing out my sawblade from cutting aluminum and steel, I cut the 'shield exactly how I wanted it.

When I went to mount it, I used washers to increase the canter. This was extremely difficult but I got it mounted and this is what it looked like:
Still a bit tall! I am sure that it looks taller than it is because it's not much more wide than the last 'shield. I thought about taking it off and cutting off about 4 inches, but as difficult as it was to mount with the modified canter, I am alright with a tall windshield. I call it "customized"!

Here it is, all finished:

I praise the Lord Jesus! You made me and saved me, and I love You for it! Amen!

Monday, November 26, 2012

Post Thanksgiving report

What a blessed week with the Baker Bunch at Bakersfield! The in-laws brought their horses and I got to ride a horse for the first time. I was a bit nervous but BIL gave some clear instructions and it wasn't as bad as it could have been, meaning I didn't fall off the horse. BIL compared it to riding a motorcycle, being that if you keep your center of gravity above the saddle, everything would be fine. Unlike a motorcycle, a horse has a mind of its own and may not always do what you tell it.

My mom was able to make it for Thanksgiving. I was telling her the story about shooting the 11 point deer and having to haul his 150 pound body up a hill to the tree we use for processing. There was jeering and no sympathy from the rest of the family (they were being humorous). I was just glad she was there to share time with a very loving family that could have only been brought together by God's plan.

Here's the deal about this deer I shot. A lot of the men at our church are hunters. By request I brought the rack of horns for them to see, and also because after church we would be back with the Baker Bunch and they wanted to see the horns first hand. All the church guys were surprised, and frankly I didn't understand why. When BIL saw the rack of horns, he just shook his head.

Apparently I shot a trophy deer, meaning that if anyone else that wasn't a noob hunter like me shot this deer, they would have taken it to a taxidermist and gladly spent the hundreds of dollars to have its head mounted on their living room wall (noob means something similar to a rookie or a newby). Instead, this guy shoots it and is perfectly happy with the 23 pounds of meat that I got off of him. After a couple days, SIL thanked me about shooting the deer because I saved her the money that her husband would have spent on getting this deer mounted.

Last Saturday night we enjoyed the LORD's provision from this deer when we all shared in eating his back strap meat. All of us were lurking about the fryer pan waiting for tasty chicken fried venison. Good stuff!

I have to say that this was the first time in a long time that I felt like a kid about the end of our Thanksgiving holiday. I was sad to see my family go their own ways, and I miss them a bit. I am eager to see them for Christmas for our crazy gift exchange. We already know what we're throwing in, so I am looking forward to time with family again.

In the mean time, if you or anyone you know wants to start hitting people with sticks, or if they want to lighten their armor weight, come to my Etsy shop and check out the starter armor knees I am making. Thanks and God bless!


Wednesday, November 14, 2012

First kill of the season.

A couple years ago BIL (brother-in-law) and I went to Bakersfield, Texas and he helped me kill and process my first deer. It was a seven point and not too small. This year I've been hunting back at Bakersfield and I've had a great time.

Back in October my SIL said there was definitely a big buck on Bakersfield because one of the trees had been scraped (meaning the deer uses the tree to scrape the skin off of its newly grown horns). She also pointed out that there were a good number of deer roaming through the area and that hunting season would be good this year.

Since the first weekend in November I'd been hunting Bakersfield and the first weekend BIL was there with his son. From my stand I watched a six point come and eat the corn that the feeder put out that morning. As it walked away (it was too small to shoot) I told BIL it may be heading his way. After that, I didn't see any deer for half an hour, so I packed it in and called it a day. BIL and son stayed but I couldn't blame him; he drove over 80 miles to hunt and I live about 25 miles away. I had plans to come back a few more times.

The next time I came to hunt a group of 4 or 5 does showed up at the feeder for breakfast. Since it wasn't Thanksgiving weeked, shooting one of them was out of the question. They caught me looking out the deer blind at them, raised their noses trying to get my scent, but didn't smell me. They finished eating and walked away, and I sat in the blind for another 10 minutes and thought, "They ate all the corn so there probably won't be any more deer." So I step out the deer blind, look left and there's a nice sized 8 point buck looking right at me. I freeze and think "Don't move and he'll walk away." He didn't walk away, he ran away into the cover of trees, then snorted a loud warning to the other deer in the area. I failed so bad at hunting!

So early Monday morning (Nov. 12th) I go hunting and I'm sure I'll get a deer because a cold front hit us and it was 38 degrees out. Being new to hunting I didn't realize how cold that temperature really is, so my thermal pants, thermal shirt, 2 pairs of pants and 2 long sleeve shirts AND facemask didn't keep me truly warm. 6am came and the feeder didn't go off. By 8am I hadn't seen any deer and my feet and hands were going numb, so I called it a day. I left the deer blind and checked the feeder. The feeder was getting power and I had corn, but there wasn't any corn on the ground. I threw some corn on the ground to keep the deer interested, then went home. Being in need of backstrap meat (the filet mignon of deer) for our upcoming family Thanksgiving get together, I went back that afternoon and hunted at dusk. I looked under the feeder and saw the corn was gone, so that told me the deer were still around. I threw some more down and sat in the blind. I didn't see deer and it was too dark to shoot so I called it a night and went to bed.

The next morning I put on the same clothing setup as above, but brought a wool hoodie to help. It did, but I failed to realize what was really causing all the problems was the cast iron chair I was sitting on in this 38 degree weather. So I was miserably cold again, and at 6am when I was expecting the feeder to go off and throw corn, it didn't. I text my FIL about the feeder battery and ask how long they last. He said some don't last long. So I didn't see deer again, I called it a day, and came home to talk to my wife about investing in rechargable batteries for the feeder, especially considering I plan on hunting through the season. We get it, charge the batteries, and I'm off to Bakersfield to hunt. This was last night.

I wake up this morning, put on the thermal pants, regular pants, thermal shirt, heavy duty hoodie, THEN my denim jumpsuit, THEN my wool hoodie, and finally my camo pants, two pairs of socks with toe warmer inserts, facemask and wool gloves. Now I'm ready.

I go to the feeder and change the battery. Test it and it shoots corn at me and all around me. I go sit in the deer blind and start listening to some sermons.

6 am the feeder goes off. I'm a little chilled where I'm sitting but it's not as bad as it has been. I'm exhausted and I start to nod off. I wake up, see no deer, nod off. Repeat about 4 times. The last time, I could really tell I probably wasn't waking up on my own power, but I hear a strange ring, not a bell, not anything I can explain, except to thank God He used that to wake me out of the slumber, because out at the feeder are 5 does eating breakfast.

A lot of thoughts go through my head; I'm discouraged because we need a deer for Thanksgiving and these were the first deer I'd seen in a week. I thought to shoot the biggest doe, I even had which one figured out because she was a pretty big doe. Then I thought "Do not disgrace your LORD by willingly violating the laws of men; God will provide." So I sat back and relaxed, enjoying watching the deer eat.

Right at this time, all the does scattered in an instant, it was crazy. It would have been as if someone dropped a bomb right on the feeder and sent the deer running all at once. I thought "that is the wierdest thing I've seen." Then the two small does came walking back to the feeder. They were eating again and then this big 12 point buck lumbers out of the woods. I was shocked; even though SIL said a big buck was on property, seeing it was amazing. I raised the blind veil, aim my .308 at his chest, and pull the trigger...

...and he runs off. This happened when I shot my last deer, but I was sure I got this one this time. Then I heard in the distance the snapping of tree limbs and twigs. "I think he just dropped" I thought. I didn't want to waste time, so I left the blind and looked at where he was standing. I looked and didn't see it, didn't see it, kept looking...

There it is. Blood on the leaves. Just a drop but it tells direction. Followed the trail, and then there was more, then a splatter. I looked to my left and there he was for me to take.

I took the meat from him and, of course, when you kill a deer like this, you never bring a camera and your phone runs out of power so you can't take a picture on the spot. I did take his horns, and with those and the meat I headed home.

Again, SIL said there was a big buck on property, but FIL couldn't believe I shot him at Bakersfield. I was just as shocked but here's the horns! Well over 13 inches wide.
Into our freezer you go!

Even though I was freezing for a few mornings, I had some great time in prayer to the LORD. Oh God, may I keep that pattern and take great time in fellowship with you. Amen!

Saturday, November 10, 2012

The Harley rides again!

I have never, EVER, had a desire to be a Harley-Davidson owner. Back when I bought my Honda Shadow 1100 it was more durable and more cost effective. Now granted I didn't like how quiet it was so I did buy aftermarket Cobra pipes to make it not sound like a sewing machine.
So back in May of 2009, my dad calls and tells me if I come get Elwood (a 1979 H-D "Fat Bob" 1200) he will give it to me free with signed title and all. I asked why and he told me he had another Harley and Elwood was beating him up too badly. If I recall, this was the fastest time I had ever said "Yes" so far in my life. Understand, my dad was the original owner, then my uncle took care of it for many years until his arthritis prevented him from riding it, then my dad got it back. Now I own it, and when I registered it in Colorado and Texas, I learned very quickly to put Sta-bil in the gas or start the motorcycle every 3 days.

I will praise the LORD all my days for the grace of being a gearhead and enjoying the time to work with machines and tools to create things. It makes me a better steward of money and resources.

Over these last 3 years I have learned a lot about how my dad and uncle took care of this motorcycle. For example, they (I really don't know if it was dad or my uncle) put a drum brake on the front tire because it's less expensive that replacing a disk rotor and caliper brakes. As a result, the speedometer doesn't operate. They also put a headlight on it that is really designed for a car, because H-D charges $50 for a head lamp and when I replaced the head lamp it was $20 at the auto store. They also put in a battery made to start ATVs, but it starts Elwood and is half the cost of an official H-D battery. I also learned how to wire a horn to the motorcycle so that it would pass Texas vehicle inspections, and it did. Barely.

So who am I to not follow in a fine line of "finaglers"? (if that's even a word; similar to what hackers are to PCs). This is my latest work: a homemade luggage rack for less than $40!


I started with 2 galvanized L-brackets, 2 eighth-inch by one by 12 inch drilled bars, and 1 eighth-inch thick by one by six inch drilled bar. The hardest part of this project was drilling through the sissy bar, which is half inch thick chromed steel. The picture above is the start.


Here is the luggage support pictured above, all put together.


I cut the base support out of 1/4" acryllic. With what's left my wife is going to get some shims for a machine she uses to make her cards (seen here).


Done! It took about 4 hours of time and less than $40 to do this (we already owned the luggage bag). Is finagling a word? I hope so, otherwise I don't know how else to describe my tendency to finagle. Take care and God bless!

Thursday, November 8, 2012

A long time coming.

It's been a long time since my last post and a tremendous amount of change since then. I really will try to boil down a year's worth of events, so here it goes.

My wife and I moved to Texas from Colorado and bought a HUD home with 3 acres of land. For the last year we've been renovating the house, cleaning 4 inches of leaves off the land so that the grass can fill in, learning to grow vegetables, cleaning fallen limbs and trees from the ground, and building out a shop to make armor in.

The shop is a tremendous blessing, and I am thankful to God to have it. I can return to making starter armor for the aspiring new medieval combat reenactment cadet. This is the most recent creation, available for sale at my Etsy site:


I always praise Christ for His works in my life. I left Washington state about to commit suicide and in a deep depression. I surrendered my life to Him and became His servant and pursued His purposes for me. I never would have begun to think I would be married, own a house, and be building a business.

Here are some other photos of what we have done in the last year. May your day be full of joy in the LORD.


  Gone fishing... with Redfish Charters

The work shop when it was started...
...and the shop when it was finished.


Starting our fall gardening area.

Might be blacksmithing in the near future. Because it's metal!